Showing posts with label cooking/baking. Show all posts

Wednesday, March 14, 2012

What’s Cookin’ Wednesday–Vegetable Tortellini Soup

I thought I’d share another one of my “go-to” meals with y’all today.  This vegetable tortellini soup is hearty enough to keep the Mr. full, healthy enough for me, and tasty enough for even a picky toddler’s taste buds!  And, it comes together really quickly.  What more could you ask for? 

sourceimage

This recipe is from the FamilyFun website and the only change I make is to add more veggies (oh – and usually leave out the onion because we’re not big onion fans here).  So, in addition to the zucchini and carrot that it calls for, I usually throw in at least a cup’s worth of additional veggies (usually whatever I have in the freezer – peas, green beans, corn, squash, etc). 

I usually serve it with whole grain french bread that I toast in the oven with a sprinkle of garlic salt.  Yum! 

Here’s the recipe card for y’all to save if you want to try it out!  If you do, I’d love to hear what you thought of it!

Tortellini_Vegetable_Soup


Pin It!

Monday, February 27, 2012

No More Grilled Steak

Way back when on Valentine’s Day, I decided instead of trying to find a sitter and fight the crowds to go out, that I would make us a nice steak dinner. And also we have yet to hire a “sitter” other than my parents for Hadley.  Pathetic, maybe, but at least we’re saving money?  Anyway, typically, that has meant that I season/marinate the meat, and then one of us throws it on the grill.  I say typically because I decided to try something different this time.  Matt was skeptical when I told him it didn’t involve the grill, and I could tell he was a little bit disappointed thinking his steak probably wouldn’t taste as good as it usually does.  You’d have to ask him, but I’m pretty sure I won over the skeptic in him after one bite of this steak.

I found this pin on Pinterest...


… and decided to give it a try, and y’all… I will never grill a steak again.  These weren’t even the best cuts of steak out there – they were simply basic filets from the grocery store – and this recipe made them taste like prime cuts. 

Here’s the recipe straight from Whit’s blog - Restaurant Style Steak

  • 2 8 ounce filet mignons
  • 4 teaspoons kosher salt
  • 4 teaspoons freshly ground pepper
  • 1 stick butter
  • 1 tablespoon olive oil
  • 2 cloves garlic
  • 1 tablespoon parsley, chopped
  • 1 tablespoon thyme, chopped
  • 1 teaspoon freshly grated lemon zest

Take 1/2 stick of butter, softened, and mix well with the peeled, chopped garlic, the chopped herbs, and the lemon zest.  Form into a log and refrigerate.  Generously season the filet’s with salt and pepper, approximately 1 teaspoon of seasoning per side.

Heat the remainder of the butter (1/2 stick) and the olive oil in a cast iron skillet to a screaming hot temperature.  Preheat your oven to 400 degrees.   Sear the filets in a screaming hot pan for about 2-3 minutes per side, or until a nice brown crust has formed. While the steak is searing, continue to spoon the residual butter in the pan on top of the meat while it’s cooking.  Once both sides are seared, place in the center of the oven for about 6-8 minutes, depending upon how thick your steak is.  In the last minute of cooking, take the log of compound butter and slice a nice thick piece to place on top.

Your steak will be ready when it is approximately 135 degrees in the center, or when you push lightly on the top center of the steak and it gently and slowly bounces back.  (Note, this is medium rare kids. Some people don’t like to eat cows while they are mooing, so clearly you can cook longer if you’re afraid of the pink.)

And because I like to have my favorite recipes on an easy to grab recipe card, here’s a digital one for y’all to save (or pin on Pinterest).

restaurant style steak


Pin It!

Wednesday, August 31, 2011

CrockPotalooza: Ranch Pork Roast

Apparently crockpot cooking is super popular right now, and Kelly at Kelly’s Korner is hosting a link up for recipes.  I am all about crock pot cooking these days, so I’m looking forward to getting some good new recipes! 

The one I’m sharing is one I just tried last night and it was really good! 

Ranch Pork Roast

image

img via: bhg

It’s really simple and delicious!  I would serve it with mac & cheese and green beans.

Here’s a recipe card I made with the directions…

ranch pork roast recipe

{Sidenote:  The original recipe I found for this said to cook it 8-10 hours on low, but I’ve found that my crockpot tends to cook things a little quicker, so I adjusted the time.}

I also found a really great BBQ Chicken crockpot recipe that I blogged about here – BBQ Chicken. 

If you have any good crockpot recipes, link up and share!


Pin It!

Sunday, July 17, 2011

Quick Sweet Treat: Pretzels Topped With Hershey’s Kisses and M&Ms

hershey-kiss-mm-pretzels

Image via

In case some of you have still not discovered (or are avoiding jumping on the bandwagon that is) Pinterest, I thought I’d share one of my recent favorite finds.   P.S. – you can use the little button to the right to find me on Pinterest – I’m always looking for more people to follow!

Square Pretzels (any shape would probably work, but I think the square ones look cute!

Hershey Kisses (any kind – I made some with regular kisses and the caramel filled ones)

M&Ms

1. Cover a baking sheet with foil.  Place the pretzel squares on a baking sheet, and top each one with a Hershey Kiss. 

2. Cook for 2-3 minutes in a 175 deg oven.  The kisses should just start to “sweat".”  If they are starting to bubble, it’s too late.  Trust me.  I wasted half a bag of kisses thinking they weren’t melted enough and I left them in so long they burned (BTW that was only 5 1/2 minutes.)

3. Press an M&M into the center of each Hershey Kiss. Refrigerate for approximately 15-20 minutes or until cool.

These are such a simple and addicting treat.  And bonus for not having to keep the oven on for long while it’s sweltering outside! 

I can’t wait to make some around Christmas with just red & green m&m’s.  Or they’d be cute for a birthday treat with only the colors of your party! 


Pin It!

Wednesday, June 29, 2011

Adventures in Baby Food: Blueberries and Peaches

I am really enjoying making all of Hadley’s baby food.  I thought I’d share another quick tutorial on how to make fruit (it’s not recommended for babies under 8 months to eat raw fruit [with the exception of bananas and avocados], so you should cook it in some way prior to pureeing.) 

I made a batch of peaches and blueberries at the same time using two different methods (warning: this will make your house smell soooo delicious you might just have to make a pie).  I decided to bake the peaches and simmer the blueberries. 

We’ll start with the peaches:

Pre-heat oven to 400.

Slice desired amount of peaches in half and remove the pits.  Place peaches “meat” side down in a baking dish with about an inch of water.   I only made 2 peaches this time around because I wanted to see if Hadley likes them before I make a huge batch, and as you can tell from the picture below, they were already pretty ripe when I made these. 

IMG_2359

Bake in the oven at 400 until the skin wrinkles and peaches are soft to the touch.  (I think this took about 20-25 minutes or so, but because I was making the blueberries at the same time, I can’t remember exactly!)  This is what they should look like when they’re done:

IMG_2373

The skins should just “slide” off at this point – see picture below.  If you have a few pieces of skin that hang on for dear life, you can either cut that part of the peach off before throwing in the puree, or just call it good. (They say that the skins of fruit can be tougher to digest for little tummies, so just use your best judgment as to what your little one can handle.)

IMG_2376

After removing the skins, throw it in a food processor or blender and puree!  I didn’t even need to add water to these because they were juicy enough on their own.

IMG_2380

The blueberries were just as simple. 

Dump a package of blueberries into a sauce pan and add just enough water to cover.

IMG_2362

Simmer the blueberries until they turn a nice deep purple – if I remember correctly, this only took about 5-10 minutes. 

IMG_2365

Drain the blueberries and reserve the water in case you want it to thin out your puree (I didn’t need any of this water either, they came out nice and juicy!)

IMG_2368

Stick in a food processor or blender and puree! 

Easy-peasy! Smile  I added some avocado to this tray to freeze, and filled the rest with the peaches and blueberries. 

IMG_2382

We haven’t tried the peaches yet, but I’d say the blueberries were a hit!

IMG_2408 copy


Pin It!

Tuesday, June 14, 2011

Making Baby Food: Sweet Potatoes

I decided, after doing a little research online, that I wanted to make Hadley’s baby food.  By making it, not only do we save a lot of money, but I like knowing exactly what it is that’s going in her little tummy.  Not to mention, it’s super easy!  I thought I’d share a quick little tutorial for anyone else thinking they might want to make their own baby food! 

I started with just one sweet potato – I wanted to see how much one would make and whether or not Hadley liked them before I went overboard. 

  • Pre-heat your oven to 400 (you can steam or boil these, or even stick them in the microwave, but I think the taste is better if they’re baked, and it makes clean-up a lot easier!)
  • Wash and dry your sweet potato(s)
  • Using a fork, poke holes all around the potato and wrap with foil

IMG_2176

  • Place the potato in the oven for about 55 minutes (until soft)
  • Let cool for about 5 minutes, then slice in half

IMG_2187

  • Using a spoon, scrape the “meat” of the potato out (if it’s fully cooked, this should be really easy)

IMG_2193

  • Place the “meat” in a food processor or blender and add breastmilk or formula to thin to your desired consistency (I used a little over an ounce of breastmilk for this batch). 

IMG_2197

  • Place in whatever containers you choose to store in – I actually have a bunch of items coming in the mail that I ordered to make solids, but since they’re not here yet, I had to improvise.  I just used some silicone cupcake liners I had, measured with water how much they hold (approximately 2 ounces when filled 3/4 the way full), and scooped the puree into them!  I left one out to try tonight and stuck the other two in the freezer.  Once they were frozen, I just popped them into a Ziploc bag and labeled it with the name of the food and the date!  From what I’ve read, most homemade baby food will last about 3 months in the freezer.  IMG_2211IMG_2212
  • In case you didn’t put 2 + 2 together, that one sweet potato that I baked made just over 6 ounces of puree.  With the amount Hadley is eating right now, that’s at least a weeks worth! 

In case you were wondering, I ordered one of these – it’s a silicone brownie-squares baking mold by Wilton.  I read some reviews and decided to get something like this rather than the ones made for baby food – that way, when we’re done with this stage, I can re-use this (plus it was cheaper!).   Each cavity holds about 1/2 an ounce, so I can just pop a couple squares in the microwave (or stick in a bowl with a lid if we’re going to be out and let them thaw on their own). 

image

If you’ve made your own, I’d love to see your recipes and here how it went! 

Sweet potatoes didn’t go so well for us the first time around… but I think she was a little bit tired, too, so next time we’ll try earlier in the day Smile

IMG_2234


Pin It!

Wednesday, June 8, 2011

Pinterest

I’m sure you’ve all heard of Pinterest by now, but on the off chance that some of you haven’t, I wanted to spread the word!  I am pretty obsessed with it already – it’s such a great way to get inspiration for anything!  Picture all of your bookmarks/favorite pages in one place with perfect little thumbnail pictures to represent them!  And then imagine a glimpse into your favorite people’s bookmarks and a way to search for things by category! 

Here’s a screenshot of one of my boards (For the home…).  It’s where I save inspiration for home decorating & organization. 

pinterest1

Here’s a glimpse at my main page with my different “boards” that I’ve made.  You can follow people who have similar taste and they can follow you so you can share ideas! 

pinterest2

It’s super addicting, so if you don’t have time in your day for anything else, I’d highly recommend staying away!  However, if you want to try it out, let me know and I’ll be glad to send an invite your way to join! 

If you’re already on Pinterest, leave me a comment with your name on there so I can follow you! 


Pin It!

Thursday, May 19, 2011

White Wine Sangria

This doesn’t fall into the “supper” category, but I wanted to share it anyways since it’s a delicious and easy recipe for entertaining!  Make sure you check out the other recipes below, and all the others on Shanty 2 Chic’s site!
Shanty 2 Chic

6a00d8345165de69e200e551dcd1218834-800wi

White Wine Sangria:
  • Bottle of your favorite white wine
  • 2/3 C sugar
  • 3 oranges OR 1 C of orange juice
  • 1 lemon
  • 1 lime
  • 1/2 liter of ginger ale
  • (For presentation – 1 more of each  - orange, lemon & lime)
Pour wine in the pitcher and squeeze the juice wedges from the orange, lemon and lime into the wine. You can toss in those wedges, or if you care about presentation, cut up fresh wedges from an additional lemon, lime and orange.  Add sugar. Chill overnight. Add ginger ale just before serving.
If you'd like to serve right away, use chilled white wine and serve over lots of ice.
Enjoy!
sangria recipe_card 
(P.S. - I made these recipe cards.  Feel free to download and save the recipe!  I'd love it if you'd credit me if you re-use them on your blog!) 
Pin It!

Neiman Marcus Brownies

This is one of my favorite desserts to make, and is yet another one of my mother-in-law’s recipes.  I’m linking up with Shanty Suppers once again AND Show Us Your Life at Kelly's Korner!
Shanty 2 Chic
Neiman Marcus Brownies:
i-nut-bar_02
Ingredients:
Crust:
  • 1 box yellow cake mix (make sure you get one without pudding)
  • 1/2 C. softened butter
  • 1 egg
Topping:
  • 1 – 8oz package softened cream cheese
  • 1/2 C. softened butter
  • 2 eggs
  • 1 tsp vanilla
  • 1 box (approx. 2 cups) powdered sugar
  • 1 C. pecans
Directions:
Preheat oven to 300.  Lightly grease & flower a 9x13 pan.  Mix cake mix, 1/2 C. butter & 1 egg.  Press into bottom of pan.  In a separate bowl, mix cream cheese, 1/2 cup softened butter, 2 eggs, vanilla & powdered sugar until smooth.  Pour over cake mixture.  Sprinkle pecans on top.
Bake for 55 minutes (watch closely – it may take a little longer).  Edges should be just turning golden brown.  Cool completely before cutting into bars.  Refrigerate when cut – serve chilled.
neimanmarcusbars 
(P.S. - I made these recipe cards.  Feel free to download and save the recipe!  I'd love it if you'd credit me if you re-use them on your blog!)
Pin It!

Shanty Suppers: Maggy’s Lasagna

I love linky parties, and one where I can get a bunch of new recipes is my kind of party!  I’m going to share a couple recipes with y’all, but be sure to check out the rest at Shanty 2 Chic to get some new dinner ideas of your own! 
Shanty 2 Chic
First up is my mother-in-law’s recipe and one of my husband’s favorite dishes – Lasagna.  I don’t make it that often because it takes awhile, but it is pretty simple and definitely a crowd pleaser.  This is also one that I make to freeze extra or bring to people because it freezes and re-heats really well. 
images
via
Maggy’s Lasagna:
Ingredients:
  • 2 lbs of ground meat cooked & drained (I cook it with garlic [diced cloves or just garlic salt], some worcestershire sauce and Mrs. Dash)
  • 1 large jar of marinara sauce (or if you’re really talented you could make your own favorite marinara sauce)
  • Lasagna noodles (I buy the no-cook kind to save time)
  • 16 oz container of cottage cheese
  • 8 oz shredded cheddar cheese
  • 8 oz shredded mozzarella cheese
  • 1 can of sliced black olives (optional – I usually do half & half b/c my husband likes olives but I’m not a fan)
Directions:
Lightly spray the bottom of a 9x13 dish with Pam.  After the meat has been cooked & drained, add the marinara sauce (and olives if desired) and let simmer for a little while.  {sidenote: I’ve played with the order of layers, and if you’re using the no-cook noodles, I think it turns out best if you use a thin layer of the sauce first} Then line the bottom of the dish with the noodles, spread a layer of the meat sauce, add a layer of the cottage cheese, then sprinkle some of the cheddar and mozzarella.  Repeat this 2 more times (or however long until your pan is full), ending with the cheese on top.  Cover with foil and bake for 45 minutes at 350.  Let sit about 10 minutes before serving. 
lasgna recipe_card
Stay tuned for a delicious dessert bar and sangria recipe to go along with this!
(P.S. - I made these recipe cards.  Feel free to download and save the recipe!  I'd love it if you'd credit me if you re-use them on your blog!) 
Pin It!

Friday, April 29, 2011

Shanty Suppers

I just saw that one of my favorite blogs – Shanty 2 Chic – is going to be hosting a recipe linky party coming up in May.  Just wanted to share so any of you can be gathering up your favorite recipes to link up!  Since my “What’s Cookin’ Wednesday” hasn’t happened in a couple weeks, hopefully I can find some new inspiration here to get going again!   You can click on the picture below to find out more information!

image


Pin It!

Wednesday, April 6, 2011

What’s Cookin’ Wednesday: Grilled Salmon with Rice Pilaf and Steamed Broccoli

I’ve never actually made today’s recipe, before today.  I have the salmon marinating in the fridge right now, so I’ll have to let you know how it turns out!  I found this recipe on All Recipes and it got great reviews, so hopefully it will get great reviews in our house, as well!
Here’s the recipe straight from allrecipes.com (I’ll come back and edit if I think it needs tweaks after trying it!)
image
Photo from allrecipes.com
Ingredients
  • 1 1/2 pounds salmon fillets
  • lemon pepper to taste
  • garlic powder to taste
  • salt to taste
  • 1/3 cup soy sauce
  • 1/3 cup brown sugar
  • 1/3 cup water
  • 1/4 cup vegetable oil
Directions
  1. Season salmon fillets with lemon pepper, garlic powder, and salt.
  2. In a small bowl, stir together soy sauce, brown sugar, water, and vegetable oil until sugar is dissolved. Place fish in a large resealable plastic bag with the soy sauce mixture, seal, and turn to coat. Refrigerate for at least 2 hours.
  3. Preheat grill for medium heat.
  4. Lightly oil grill grate. Place salmon on the preheated grill, and discard marinade. Cook salmon for 6 to 8 minutes per side, or until the fish flakes easily with a fork.
Pretty simple, right?  I’m serving it with rice pilaf and broccoli tonight.  I’m pretty sure Matt could eat rice pilaf every night of the week, so it’s a popular side dish in our house. 
I’ve never cooked salmon before – do you have any great tips or recipes to share?


Pin It!

Wednesday, March 30, 2011

What’s Cookin’ Wednesday: Garlic & herbed chicken, roasted italian potatoes and green beans

This will be a quick one, since Hadley is about to wake up from her nap, but I am trying to stick with this so I have a few blog posts about something other than Hadley!

Tonight I’m making garlic & herbed chicken, roasted italian potatoes and green beans.  It’s really not as fancy as it sounds.  All you need is:

Mrs. Dash garlic & herb seasoning

Italian dressing seasoning packet

Olive oil

2 chicken breasts

Potatoes (depending on the size of potatoes – I usually use 2 or 3)

Green beans (you can buy the steam in a bag ones or use fresh)

2 ziplock bags (for seasoning)

Use olive oil and Mrs. Dash seasoning in one bag – throw the chicken breasts in and toss to coat.  Place in casserole dish (sprayed lightly with cooking oil).  Cut up potatoes into “fries” or bite-size cubes.  Place in ziplock bag, drizzle olive oil and italian dressing seasoning packet.  Toss to coat.  (You can do the same thing with the green beans if you have fresh – or you can use the steam in a bag and just stick that in the microwave when you’re ready to eat). 

Place potatoes in the casserole dish along with the chicken and bake in the oven at 375 for 55 minutes.  Enjoy!


Pin It!

Wednesday, March 23, 2011

What’s Cookin’ Wednesday

This post won’t be anything exciting, but I am trying to stick with the recipe Wednesday posts, so I’ll post it anyways. Smile 

First off, I am LUCKY to even have anything ready to go today.  Hadley has been a hot mess lately.  She is pretty much all better after her cold and ear infection, but she must be going through a growth spurt (or just making up for lost time when she was sick), because the child wants to eat non.stop.  Not only is she wanting to eat constantly, but her napping & regular sleeping has gone out the window.  I have to prepare myself for battle every time I am putting her down for a nap.  Add all of that to the fact that the antibiotics she’s on have made for some not-so-pleasant diapers and 10x the amount of laundry to keep up with and I am one exhausted mama. 

So, with all of that said, I needed an easy recipe today, so I pulled out the crockpot.  Beef stew it is!

image

Picture from McCormick.com

Prep Time: 15 minutes

Cook Time: 8 hours on LOW or 4 hours on HIGH
You Will Need
2 lbs. stew beef, cut into 1-inch cubes  (I just buy the stew meat at the grocery store – already cut up for you!)
5 cups cut-up fresh vegetables, such as carrots, celery, peas, onions and potatoes
1 pkg. McCormick® Slow Cookers Hearty Beef Seasoning
1 1/3 cups water

PLACE beef and vegetables in slow cooker.

MIX Seasoning and water until blended. Pour over beef and vegetables; toss to coat well. Cover.

COOK 8 hours on LOW or 4 hours on HIGH. Stir before serving.
Makes 8 servings.
IMPORTANT: For best results, do not remove cover during cooking.

That’s all there is to it!  Super easy, healthy and hearty.  Soup isn’t usually enough of a meal for Matt, but he loves this beef stew, so it’s a winner for me.  I usually serve it with some whole wheat rolls.  Oh – and this makes GREAT leftovers for my lunches.  I’m lucky if I remember to eat lunch, and when I do, I usually only have a couple minutes, so I love to have something quick and filling to heat up. 

On another note – I’ve gotten a few new followers lately.  Would anyone be interested in posting your own recipes and linking up for this?  I’d love to get some new recipes from people!  Let me know! (Or leave a recipe in the comments if you feel like it!)

Thanks!


Pin It!

Wednesday, March 16, 2011

What’s Cookin’ Wednesday: Spinach Asparagus Pasta

This was actually our meal last night, and not tonight, but close enough, right?  Even with a sick baby I managed to throw this one together, so that tells you how easy it is.  Plus, it’s pretty healthy (especially when you have to leave the cheese out of it!) and husband-approved. Smile  Enjoy!


Penne with Asparagus, Spinach, and Bacon

Cooking Light
Penne with Asparagus, Spinach, and Bacon
Photo: Lee Harrelson; Styling: Leigh Ann Ross
This pasta toss comes together in a snap on busy weeknights. Complement it with a glass of white wine, such as sauvignon blanc, and garlic-Parmesan breadsticks.
Yield: 4 servings (serving size: about 1 1/2 cups pasta mixture and 1 tablespoon cheese)

Ingredients

  • 8  ounces  uncooked penne pasta
  • 2  bacon slices
  • 2 1/2  cups  (1-inch) slices asparagus (about 1 pound)
  • 1 1/2  cups  fat-free, less-sodium chicken broth
  • 4  cups  bagged baby spinach leaves
  • (for those of you lucky kids who can have dairy)  1/2  cup  (2 ounces) pre-shredded Parmesan cheese, divided
  • 1/4  teaspoon  black pepper
  • **2 chicken breasts
**I added the chicken breasts this time to make it a little “heartier” for Matt and to stretch the recipe a bit so we’d have more leftovers.  I simply boiled the chicken, then shredded it and tossed it in at the end.  I also used the water that I boiled the chicken in to cook the pasta, which gives it a little extra flavor. 

Preparation

Cook pasta according to the package directions, omitting salt and fat. Drain; keep warm.
Cook bacon in a large nonstick skillet over medium heat until crisp. Remove bacon from pan; crumble.  Add asparagus and broth to pan; bring to a boil. Reduce heat, and simmer 5 minutes or until asparagus is crisp-tender. Add pasta, spinach, 1/4 cup cheese, and pepper to pan; toss well. Sprinkle with remaining 1/4 cup cheese and bacon.

Nutritional Information

Calories:
363 (25% from fat)
Fat:
10.2g (sat 4.2g,mono 3.6g,poly 0.8g)

Pin It!

Wednesday, March 9, 2011

What’s Cookin’ Wednesday: Italian Sausage & Penne Bake

image

I’m not sure if I’ll make this a regular “thing” or not, but since it’s Wednesday, and I just went to the grocery store, I’ve got meal planning on my mind.  Ever since I had Hadley, meals have been a thorn in my side.  Something I used to like doing – cooking, getting creative with meals and planning and organizing it all out – has become a huge chore and a stress.  Thankfully, our families helped out A LOT and made us lots of meals to be frozen, so up until this point, I had a lot of help.  However, my freezer has been emptied and with Hadley a little over 2 months old, I figured it was time for me to get my act together. 

It seems that Hadley knows when I need to cook.  She suddenly doesn’t want to nap, doesn’t want to play on her play mat and just wants to cry/be awake when mama needs to make dinner.  Even today, I thought “I’ll outsmart her this time – she is always awake around 6 when I need to make dinner, so during her afternoon nap I’ll get dinner all prepped and ready so all I have to do is throw it in the oven!”  Well – guess who decided she didn’t want to go down for her nap just as soon as I turned on the burner?  (Sidenote: I was able to get her down eventually – thank heavens for swings! – and managed to stick to my afternoon cooking plan.)

To add to the stress of planning/shopping for/cooking meals, I am currently not eating any dairy in an effort to help Hadley’s tummy out.  Most of the “easy” meals I know of consist of a cream of whatever soup, some cheese, pasta, a meat/veggie all thrown in a casserole dish.  Well, take out the cream of whatever and cheese and it doesn’t taste quite as good anymore.  So, with my recipe list cut in half (at least), I decided to start blogging (ha- we’ll see if this ever happens again on a Wednesday) about the meals I am making so I’ve got easy access to the ideas when I’m in a rut again!

So, all of that said, here’s what’s cooking for us today!

Italian sausage with Penne & Zucchini

image*image from Google images*

Penne pasta

1 zucchini

1 lb of italian sausage

1 jar of Tomato sauce (or make your own if you have the time!)

**If I was eating dairy, my favorite ingredient would also be in here – CHEESE**

You could also throw in any other veggies you like – peppers, onions, etc.  We’re not big pepper or onion eaters in this house, so I like to keep it simple. 

Lawry’s season salt

Oregano (I like to throw a little of this in the jarred sauce and the sausage)

Simply brown the sausage while you’re cooking the pasta (don’t overcook the pasta or it will get soggy when you throw it in the oven).  Once the sausage is done, throw it in a bowl to mix with the pasta and jar of tomato sauce.  I browned the zucchini in the same pan I cooked the sausage in to give it a little extra flavor.  I usually season zucchini with Lawry’s season salt too.  Once the pasta and zucchini are done, throw it all together and put it in a casserole dish.  **I would throw in about a cup of mozzarella to mix in, and top with cheese as well if I wasn’t leaving out the dairy**  It’s as simple as that!  I threw it all together and put it in the fridge, so when Matt calls to tell me he’s on his way home, all I have to do is throw it in the oven to bake it all together.  This is also an easy one to double and freeze half (or if you don’t like leftovers, put this in 2 smaller casserole dishes and freeze one for another day!). 


Pin It!

Tuesday, December 14, 2010

Christmas Baking

A couple days ago, I posted on facebook that I had done some Christmas cookie baking.  I had a request to share the recipes, so I thought I’d post the links to them on the blog so that I could easily get back to reference the recipes in the future.  I wish I could say I used old hand-me-down recipes with fabulous secret ingredients in them, but I didn’t.  I did, however, reference one of my favorite baking blogs – The Brown Eyed Baker. 

So, with that said, I gathered the ingredients and proceeded to make Buckeye Balls, Peanut Butter Blossoms, Snickerdoodles, Sand Tarts, and I have the dough in the freezer to make cut-out cookies later this week.  Never in a million years would I have had the energy/motivation to do all of that on my own, so I invited some girlfriends over to help bake.  It was such a fun afternoon (although exhausting at 9 months pregnant – I literally napped my way through the next day), that I hope we can make it a tradition every year! 

Without further adieu… click the title or the picture to be taken to the Brown Eyed Baker’s blog for the recipe.

Buckeye Balls

image

Yield: 6-7 dozen

1 ½ cups peanut butter
6 cups powdered sugar
1 cup (2 sticks) butter, softened
½ teaspoon vanilla extract
4 cups semisweet chocolate chips
¼ cup shortening

1. Line cookie sheet with wax paper. Mix together butter, peanut butter, sugar, and vanilla with a wooden spoon in a large bowl.

2. Roll dough into 1-inch balls. Set them on prepared cookie sheet and insert toothpick into each ball. Chill in freezer until hard, approximately 30 minutes.

3. Melt chocolate chips and shortening over medium-high heat. Remove the pan from heat. Dip balls in chocolate and place back on cookie sheet. Refrigerate until chocolate is set, approximately 2 hours.

Store in airtight container in refrigerator.


Snickerdoodles

image

Yield: About 4 dozen

2¾ cups flour
2 teaspoons cream of tartar
1 teaspoon baking soda
¼ teaspoon salt
1 cup (2 sticks) unsalted butter, at room temperature
1½ cups sugar
2 eggs
1 teaspoon vanilla extract
3 tablespoons sugar
1 tablespoon cinnamon

1. Preheat oven to 350°F. Line baking sheets with parchment paper or a baking mat and put in refrigerator to chill.

2. Whisk together the flour, cream of tartar, baking soda and salt in a medium bowl. Set aside.

3. Cream together the butter and sugar until pale and fluffy. Add the eggs, one at a time, beating well after each addition. Beat in the vanilla.

4. Gradually stir in the flour mixture, beating on low speed just until the flour is blended.

5. Chill the dough for at least 30 minutes.

6. In the meantime, mix together the sugar and cinnamon in a small bowl.

7. Scoop 1-inch balls of dough and roll in the cinnamon and sugar mixture to coat.

8. Place on chilled cookie sheet about 2 inches apart and bake for 10 minutes.

9. Chill the dough and cookie sheets between batches.

10. Let cookies set on baking sheet for 2-3 minutes and then remove to a cooling rack. Store cookies in an airtight container.


Peanut Butter Blossoms
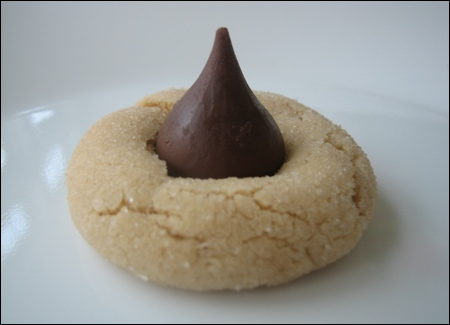
image

Yield: About 4 dozen

Ingredients:
48 Hershey’s kisses, unwrapped
½ cup shortening
¾ cup peanut butter
1/3 cup granulated sugar
1/3 cup packed light brown sugar
1 egg
2 tablespoons milk
1 teaspoon vanilla extract
1 ½ cups flour
1 teaspoon baking soda
½ teaspoon salt
Sugar

Directions:
Preheat oven to 375. Remove wrappers from chocolates.

Beat shortening and peanut butter in a large bowl until well blended. Add 1/3 cup sugar and brown sugar; beat until fluffy. Add egg, milk and vanilla; beat well. Stir together flour, baking soda and salt; gradually beat into peanut butter mixture.

Shape dough into 1-inch balls (I used my small cookie scoop from Pampered Chef and got exactly 48 cookies). Roll in sugar; place on ungreased cookie sheet.

Bake 8-10 minutes or until lightly browned. Immediately press a chocolate kiss into the center of each cookie; cookie will crack around edges. Remove from cookie sheet to wire rack. Cool completely.


Cut-Out Sugar Cookies (I’ll post some of my own after I get these baked & decorated!)
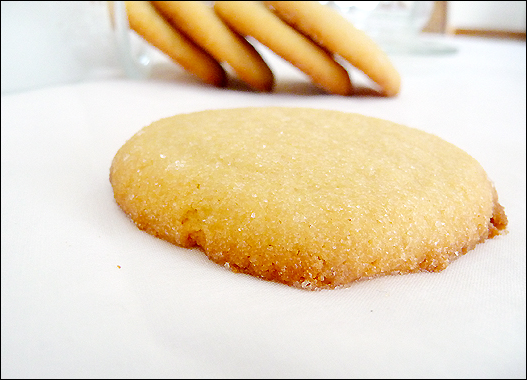
image

Yield: About 24 cookies

Prep Time: 15 minutes | Bake Time: 15-18 minutes

2 cups (10 ounces) all-purpose flour
½ teaspoon baking powder
½ teaspoon salt
16 tablespoons (2 sticks) unsalted butter, softened but still cool
1 cup (7 ounces) granulated sugar, plus ½ cup for rolling dough
1 tablespoon light brown sugar
1 large egg
1½ teaspoons vanilla extract

1. Adjust the oven racks to the upper- and lower-middle positions and heat the oven to 375 degrees F. Line 2 large baking sheets with parchment paper or spray them with nonstick cooking spray. Whisk the flour, baking powder, and salt together in a medium bowl; set aside.

2. Cream the butter, the 1 cup granulated sugar, and the brown sugar at medium speed until light and fluffy, about 3 minutes, scraping down the sides of the bowl with a rubber spatula as needed. Add the egg and vanilla; beat at medium speed until combined, about 30 seconds. Add the dry ingredients and beat at low speed until just combined, about 30 seconds, scraping down the bowl as needed.

3. Place the ½ cup sugar for rolling in a shallow bowl. Fill a medium bowl halfway with cold tap water. Dip your hands in the water and shake off any excess (this will prevent the dough from sticking to your hands and ensure that the sugar sticks to the dough). Roll a heaping tablespoon of dough into a 1½-inch ball between moistened palms, roll the ball in the sugar, and then place it on the prepared baking sheet. Repeat with the remaining dough, moistening your hands as necessary and spacing the balls about 2 inches apart (you should be able to fit 12 cookies on each sheet). Butter the bottom of a drinking glass and then dip the bottom of the glass in the remaining sugar. Flatten the dough balls with the bottom of the glass until they are about ¾ inch thick, dipping the glass in sugar as necessary to prevent sticking (after every 2 or 3 cookies).

4. Bake until the cookies are golden brown around the edges and their center are just set and very lightly colored, 15 to 18 minutes, rotating the baking sheets front to back and top to bottom halfway through the baking time. Cool the cookies on the baking sheets about 3 minutes; using a wide metal spatula, transfer the cookies to a wire rack and cool to room temperature. Store in an airtight container at room temperature.

Here are the Brown Eyed Baker’s tips for adapting that recipe for cut-outs:

How to Adapt for Cut-Out Cookies:
  • Prepare the dough as directed through Step #2 in the directions.
  • Shape the dough into a disk and wrap tightly with plastic wrap. Refrigerate for at least 1 hour. (You can refrigerate up to 2 days, or freeze it and take it out and put in the refrigerator about 12 hours before you plan to bake.)
  • Remove dough from refrigerator and let sit at room temperature for 10-15 minutes.
  • Flour the counter, the dough and a rolling pin and roll the dough out to ¼-inch thickness. Dip a cookie cutter in flour and cut out your cookies, placing them on a parchment-lined baking sheet.
  • Refrigerate the baking sheet for at least 15 minutes before baking. Preheat the oven to 375 degrees F.
  • Bake for 8-9 minutes until edges are just ready to turn the slightest bit light brown (you really don’t want much coloring at all on these cookies), rotating the pan 180 degrees halfway through baking.
  • Cool on a wire rack and store in an airtight container.

And I’ll have to get back to you on the Sand Tart recipe – that recipe came from one of my girlfriends and I don’t have it here.  Growing up we always made corn-flake wreaths too, but my mom is making those to bring up to our house this year so I didn’t tackle those. 

image

I would love to hear from anyone (if there’s anyone still reading this with my lack of blogging lately) else who has favorite Christmas cookie recipes!  Feel free to comment & share!  Smile


Pin It!
Related Posts Plugin for WordPress, Blogger...